Ok so the moment I’ve been threatening for a while now is here, work on my first IOM has begun. This is my first serious attempt at building any kind of model yacht so I’m no doubt going to asking a lot of questions!
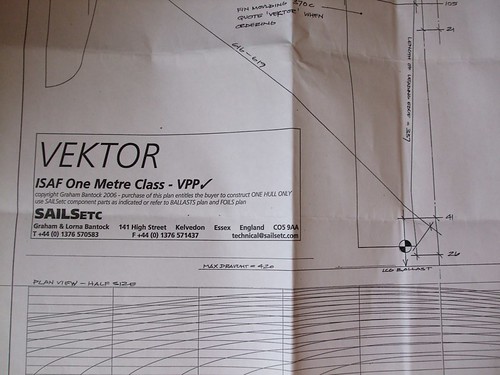
I’m building the Graham Bantock designed - Vektor
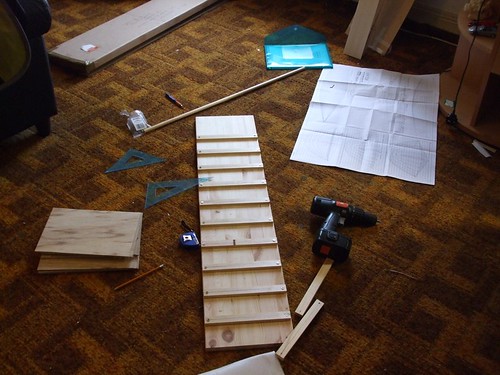
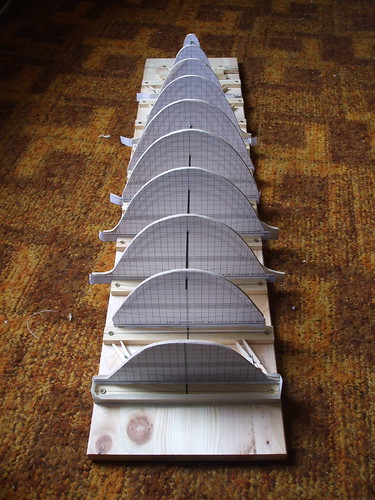
I’ve started by marking out my building board, getting the shadow material prepped and cutting and drilling all the battens.
I often hear people saying IOM’s can be built on the living room table but i hope to prove you don’t even need one of those…
The floor is where this boat is being built! ahhhhh the benefits of being a bachelor!
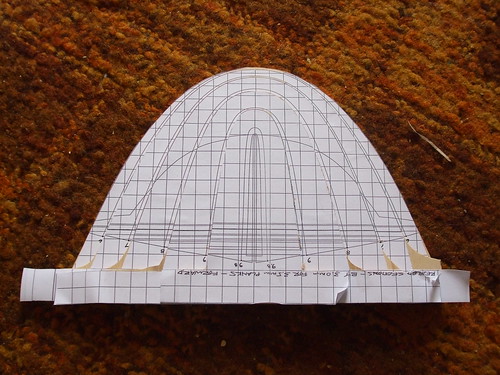
Here is my building board marked up but missing the centre line (which i forgot about!)
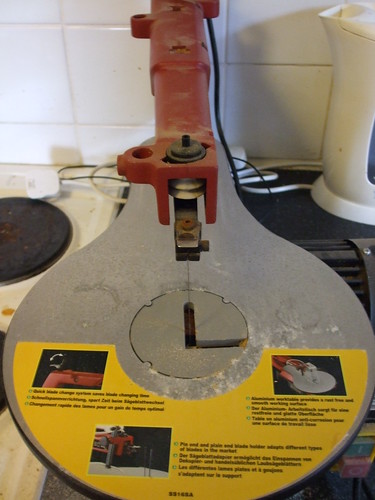
The next task is to cut out all the shadow templates, glue them to the ready prepared bits of plywood and give the awesome fret saw I’ve borrowed (cheers richie b!) a good work out.
I’m intending to keep this post fully updated with my progress, wish me luck!
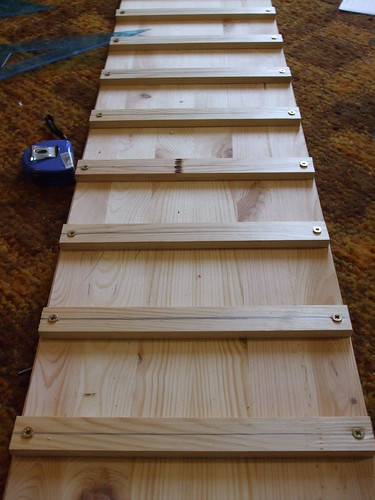
The first thing to note is that the forward shadows (bow to mid section)are mounted behind the station lines and the rear shadows are mounted in front of the station lines. This will give the correct shape and allow easier removal of the shadows later. Also it is a good idea to tape the edges of the shadows as that helps prevent glue from the planks sticking to the shadows.
Here is a web site showing the steps to build a planked hull. It has some useful tips.
I have seen 2 planking strategies. The one I used was to fit each plank and just fit the end to the next plank. Planks get shorter as the you ‘close’ the hole.
The other method is to fully taper each plank on jig. So all planks go the full length of the boat. Looks good if you plan a clear finish to show the planks but a lot more work fi you are going to paint the hull.
You will need a balsa stripper to ‘rip’ the planks. I made one out of 2 pieces of 16 inch scrap, joined at right angle. Then mount a sharp blade on a scrap on wood the thickness of the planks and attach to the side of the stripper. Now just push the balsa sheet against the jig and through the blade to mass produce the planks.
Cheers for the info, I have a copy of the US1M construction guide already printed out and I have bought the Chris Jackson Book - Radio Controlled Racing Sailboats. I been studying those for a good 3 months now and lurking on this kind of forum for 6 months or so. Its taken me that long just to get it all worked out in my head so its time to get my feet wet so to speak!
Next week I’m purchasing a secondhand IOM thats ready to sail, full radio gear and 3 almost brand new sets of sails so i’m not depending on this first attempt at building to get me on the water. The boat I’m buying is currently being set up by the guy that finished 15th in last years world Championships so i think i would sensible to use that boat for the foreseeable future until i’ve managed to build a really good hull.
In this regard, given the price of manufactured hull from somewhere like Sailsetc, I calculated (given the price of raw materials and the fact that my time is free) I can make approx 25 hulls before it would be more cost effective to just buy one ready made!
Once i realized this I’m a lot more relaxed about the whole thing and especially with my first attempt as its just a learning process.
I’m hopefully going to make some progress today so will be back later with an update.
Just a couple of thoughts - take 'em or leave 'em.
I’m not sure how thick your building board is, but you want to be sure that it will not be pulled out of “flat” or warp in any way. A couple of pieces of timber length-wise underneath will achieve this if you consider the board is not thick enough. I use a 1" (25mm) board with two 3/4" runners down its underside. Overkill? Yes - but my board is straight.
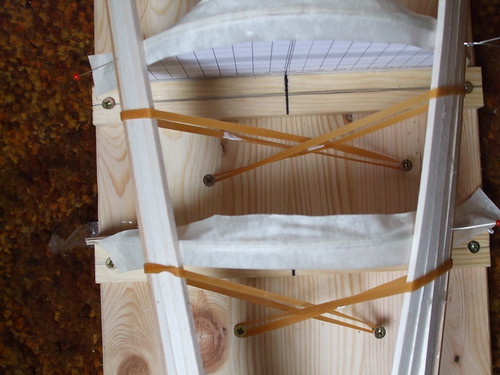
Secondly, I note that you have screwed the bases of your shadows into the building board from above. While there is no reason to expect that you will have a problem when you come to release the hull from the shadows, in the event that you do (e.g. a little epoxy goes somewhere it shouldn’t have) it is helpful to be able to release the shadows from the building board. This then allows the shadows to be twisted out of the hull in a controlled fashion and without damage.
With the hull in place on the building board, you cannot unscrew the shadows (at least based on the photo).
So if the base of the shadows are screwed to the building board from beneath, and you have a problem, you can still access the screw heads to unscrew the shadows from the board.
Tim - you will now have 4 cents worth of opinion - as I add my 2 cents to that already provided by Muzza…
I would be concerned and echo his suggestion about the underside lumber to prevent warping. The base material you used is of pine and is probably one piece wide. This will have a tendency to warp/cup as moisture levels change. While the template bases are screwed cross-grain, I would make similar ones underneath - and add lengthwise stringers as well. When building, I prefer to use particle-board (as it is called here) for a base. It is very fine wood chips and sawdust glued and pressed under very high heat and pressure to form a very flat and stable surface. It comes in nominal sheet sizes of 4 ft. x 8 ft. - but is also sold as shelving material cut to a width of 8 - 12 inches. It is very stable across the width of the board - but it too can use a stiffener set of lengthwise stringers on the bottom.
And as Muzza also noted, being able to release the template/shadow stations is helpful so screwing or attaching from the bottom of the board is suggested.
thanks for the tips guys thats exactly why i’m posting this build on here to get the advice of people that have built a lot of boats already!
The wood i’m using for the building board is actually laminated (6 strips glued lengthways). I selected it from the DIY store in the hope that fact its laminated will stop it warping?! I guess i’ll find out in time!
Your concerns about the way i’ve screwed the shadows are valid, however the first pictures might have been misleading as the gunwales don’t go all the down to the building board. Now the first planks are on i have tested and i can ‘just’ reach the screws for when the time comes to remove the shadows…
its a tight squeeze though and i think next time i’ll screw them in from underneath!
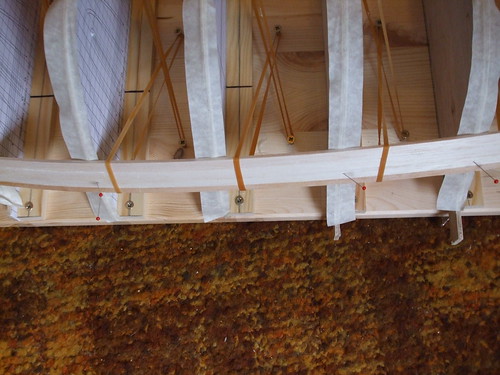
I’ve glued the first 10 or so planks using a rather elaborate system of elastic bands which seems to be working really well (for now)
I’m under no illusions that this phase of planking is easy and as soon as the planks start meeting at the bow and transom its going to get tricky!
with this is mind has anyone got any advice for how to test fit and trim the more difficult planks? i.e. do you press them in place and use a pen to work out the angle of the cuts? any help with this is appreciated!
To fit the planks, I would dry fit the plank and use my Exacto saw blade to press a mark into the plank showing the cut line. Then cut it and dry fit again. Remember that the cut will be a compound angle.
Also as I went around the curve, I would undercut the plank with sand paper to fit it against the previous plank.
you can also have a “friend” lie down inside the hull and mark the plank from the inside as you hold it in place from the outside. OK, OK - just kidding.
When I’ve used planks, I follow pretty much what John (hiljoball) has posted with only one difference… I keep several extra and short strip planks and use the end of a short piece to establish angle - then transfer that to the full length strip. This only requires a short section of planking, and looking at your photos, you could use the portion of the planking that extends beyond the transom to use this idea. Much easier than fooling with a full length strip each time - but yes … it does require cutting twice - once for the pattern and once for the final plank.
Thats an awesome idea Dick and one i haven’t seen anywhere else, thats the method i’m going to try. I’ve been planking away this evening but haven’t managed to get any pics, hopefully get some posted tomorrow.
Tim
When you get to the sanding part go very slowly and lightly. With balsa planking it is very easy to bend the planks while sanding. This removes to much material over the shadows(where there is backing) and not enough between. A lumpy hull is the result. It just occured to me that maybe I should have removed the shadows before I sanded. Has anyone tried this with a balsa hull?
Don
it was Michael Scharmer with the additional shadow idea - I think.
haven’t had chance to work on my boat tonight, I went down to the club I’ve just joined to watch the racing instead and had my first ever go on an RC yacht (a very nice cockatoo IOM) which somebody lent me for 10 mins.
Another tip on planking: I used CA glue on the strips and didn’t have to stop to let anything dry. I did use pins to hold some flatter sections tight to the shadows. I could cut and glue, cut and glue… till I got tired of fooling with it My first one was a Vanquish, photo’s here:
progress has been slow these last couple of days, I’ve begun the trickier sections of planking and i’m taking my time to try and get it right. I must admit to being a little distracted by hew565’s awesome post on rcgroups… if my IOM build comes out half as good i’ll be over the moon!
in other news I’ve ordered in the epoxy and fibreglass i’ll be using in the next stage. I’ve gone for West System (with the slow hardener) and i’ve ordered 200gsm plain weave and 280gsm twill weave fibreglass cloth. next up i need to get a set of digital scales which i hope to use to see if i’m building heavier/lighter than i should be (in consultation with Anders Walin’s IOM weight budget)
a gentle reminder … WEST mixes 5:1 ratio - so if you also bought a set of mini-pumps, it is one complete push of each pump - big AND small.
I’ve also posted (again) a copy of the Gougeon’s recommended method for mixing small amounts of epoxy. Enlarge or reduce on copier to amount needed, and just dispense enough to fill each of the circles. Place wax paper or clear polyurethane film over the printout to allow you to see what you are doing. Thus, if a specific part of the project requires a very small amount, you don’t waste a full stroke of the epoxy. Just squirt out a small circle of resin, then squirt out a smaller circle of hardener and mix completely. You will find your epoxy goes a long way.
For smaller amounts of epoxy, I have marked 1/2 and 1/4 strokes on my West pumps. Push the plunger for a full pump, them mark the plunger where it goes into the top. Release it and carefully measure the distance from the top to your mark, and halve it. Then halve again for a 1/4 stroke. It has worked well for me.
I tried the gougeon method from Dick’s post, but the % margin for error is so great when you try to mix amounts that small, that I never got a good cure.
Once you glass the inside of the hull, go back and “scrub” another coat of epoxy onto the surface. When (not if) you get water inside, it will seep into any pinholes and swell up the balsa core (I don’t want to talk about it :mad:). The extra coat rubbed into these pinholes will seal it up. Warming up the epoxy will make it flow easier, AND as it cools, it may be drawn into the balsa a little. Tough to fix the problem after you have the deck on!


 OK, OK - just kidding.
 My first one was a Vanquish, photo’s here: