Easy Footy: Footy project development for clubs, schools and future possible Kits

Hello to all.
As promised to my friend Thomas (of IFCA) will also present here our Italian development project Easy Footy.

After Footy Gold Cup 2012 in Sestriere was very impressed by the excellent performance of the Phil Tyler boat that arrives at the 4th final place.

Studying the pictures taken and the info that Phil had posted on that forum was very easy to understand that the boat was essential, simple and very easy to build.
In Italy, and not only, there is lacks of young people who are dedicated to RC sailing and I got the idea to create a track easy to follow to realize a boat very cheap in a few nights and with very little equipment.

The depron material is a very well-known among young model airplane flying with indoor and lends itself to create small boats (as long as there is a good structural design as a starting point), it is waterproof and does not need to be painted to stay in “water”.

For the general conception so I started the project Easy Sail of which you see the presentation on my site here: www.progetto-urca.com/urca/progettando/Easy_RC/index.htm. in my web page there are also links to the Italian Forum of the Barone Rosso and the log building complete construction drawings with which is was made in many copies.

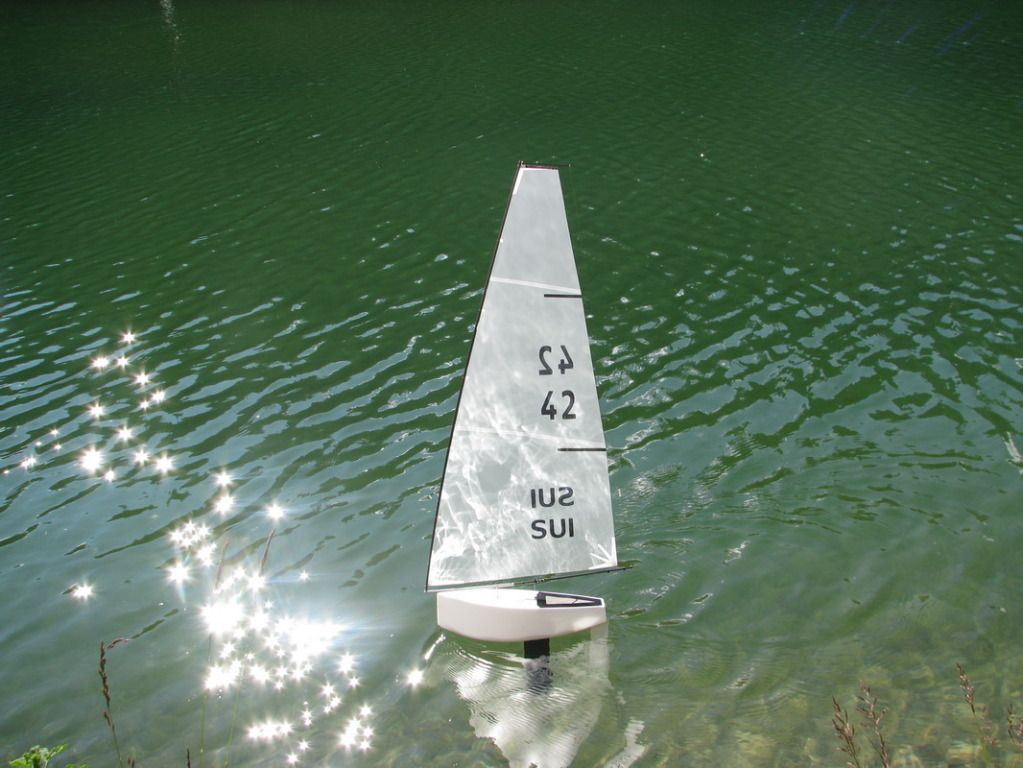
For forms and position of sails and appendages instead I followed in principle the Phil Tyler boat.
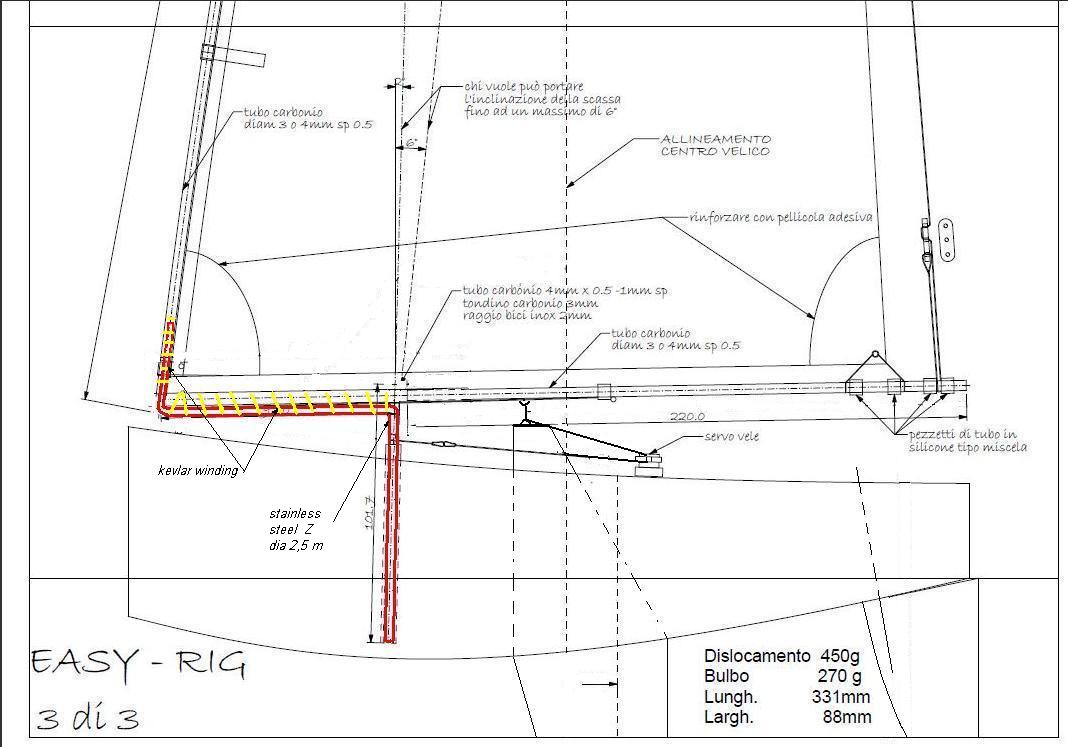
We have made any prototypes and we are now at the final definition of the project and my friend Camillo Giammarco is transferring everything on beautiful drawings cad.

Here a preview of draft copy

The main parameters are:
Boat not extremely diagonal with an overall length of about 32 cm
displacement between 450 and 500 grams
bulb weight between 270 and 300 grams
Main sail area to the rig: 13.5 to 14 dm2

Now a couple of prototypes and sail plan optimizations were introduced in the drawings of this final version.
In each part conception the main goal is to maintain the principle of “take it easy” and making every part easily and with the minimum of equipment.
In the next post I will explain the construction sequences and put online the construction drawings to build this boat that probably in the future could become a simple short kit to be assembled.

To be continued…
Greetings

Claudio

This is my footy to build this year, starting now, but I would be glad of help and advice from the expert

I have been reading the “easy footy” thread in the baronerosso forum, but I have to confess that I speak Italian like a native – of Scotland.

So of all the plans/developed shapes published I am not sure (without going to use Google translator extensively) which version to make!

I saw and admired the performance of Phil’s boat at the Gold Cup and want to have a footy which is reliable, simple and allows better finishing than the beautiful Presto (in my hands at least)

So of all the variants of the Easy Footy presented I would like to have a vertical keel (not the one sloping backwards) and for the Macrig – possibly with three mast pivot points.

Can you please tell/show me which of the hull plans has the vertical keel?

I will work in depron – 2 or 3mm, possibly with high-tech surface finish and the glue should be at my home already today

I will, if it is of interest to anyone take and post pictures here?
andrew

Hi ClaudioV,

Phil Tyler’s footy concept is beauty in simplicity, I’m intrigued with the rig, is it right that the mast doubles as the luff of the single sail luff ? it is hard to tell from the pictures but where is the sail pivot point, on the fore-deck of mid ship ?

Cheers Alan

Hi Andrew,

On our Italian forum you have seen the development of the project till now that passed through various experiment in order to show various possibilities and system to develop a depron “racing” Footy.
At the moment my friend Camillo is working to prepare the final drawing of the boat starting from my draft copies and it will be presented as soon as available with all the depron and slide folex parts developed.
Also I need more time to write in my “quite English” than in Italian, so I’ll post here a summary of the various post that will be in Italian Barone Rosso.
Anyway I’ll try to report here all the information and the sequences of easy footy construction. If you want to post in this topic the realization of your boat in parallel… you’re welcome.
The overall final Easy Footy plans will be quite you are asking :wink:
I could anticipate that the keel is vertical but is trapezoidal and will be presented with 2 different construction methods:
Method 1: shaped depron + 3 mm carbon tube + plastic coating with slide folex
Method 2: aluminium 0.5 mm sheet + 2 mm carbon rod

For explanation of slide folex:

For the rig, in order to answer also to Alan

The rig is a Zrig composed by a Z in stainless steel dia 2-2.5 mm and mast+boom in carbon tube dia 4 mm.
The boom is glued with cyanoacrylate on Z in steel and then tied with dacron wire (or better kevlar) + cyanoacrylate in such a way that it is perfectly integral.
The mast tube is inserted on Z, glued in place and then tied with wire dacron (or better kevlar) + cyanoacrylate so it can not “open” or delaminate locally.

To explain to Alan the concept, Z rig is a kind of swing rig but simplified with only one sail.
On the boat there are provided 2 or 3 tube internal dia approx 3 mm closed on the bottom to allow repositioning of the rig

I hope that with that sketches it is clear to understand the system.
Bye

Hello
Claudio
Thank you for your continued efforts to bring ‘easy footy’ to everyones attention. There is some inspirational information in the links you have kindly provided.
Andrew
Yes, it would be of interest if you would post pictures of your progress, please.
Alan
The accompanying picture is of the same rig and hull that features in the first picture of this thread. Although I hope it helps clarification of some details, please be aware that, with an 820mm long mast, this is the largest sail I’ve used on a Footy. If memory serves me correctly, it was sailed just once in Sestriere and I ‘changed down’ before racing.
Regards
Phil

Hello to all
After many emails, post and phone calls with Camillo, we finally completed our work for the hull and appendages.
Here is the result: the complete project in one pdf file of 5 sheets, the first 3 to be printed on A3 paper and the last 2 to be print on A4 Slide Folex.
Each page has in the edge a ruler to verify the correct print in scale 1:1

On page 1 and 2, the side view of the Easy Footy with all dimentions and sections to assemble the hull, appendages, mast tube, etc.

On page 3, there are flat developments of all the hull parts, stiffeners and internal bracing to be realized in 3 mm Depron.

In the last 2 pages in A4 are developed all the parts to be cut in Slide Folex (in alternative similar search on google: transparency film hp inkjet) and shape of the fin and rudder in depron (3mm)

Slide folex are well bonded with UHU POR that are usable off course on depron; for internal side sealing and closure of the hull the best adhesive is : saratoga WD4 or Henkel-Pattex PU: http://www.portalehenkel.it/brands/prodotti/pattex_legno_pu_liquid_250g.html

In attachment there is also the list of materials and the approx cost in Euros to make one boat.
Because of the little quantity of material required to make a single boat (without electronics), the cost will decrease realizing 4-6 boat from the minimum stock of purchased material and start from a minimum of ~ 20 to 40 Euros.

To make the final verification, now I’ll mount an Easy Footy and I’ll try to post here the sequence of complete realization.
Naturally…:wink: Who is sufficiently skilled will be able to proceed alone and quickly realize his boat.

The drawings of the rig and sail plan are in progress and will be completed soon.
Bye

Claudio

Thank you for posting these - my EasyFooty project gets under way tonight using these plans as a base

I will post my build log so that readers can have a good laugh, and hopefully people will think: “that can’t be too difficult if andrew can do it” (normally people say “even andrew…” )

I have decided that I will never again suffer equipment failure, so the boat will have new radio and servos. So I am selecting servos, specially the sail control servo, and am happy for advice on a mid-sized, strong and bulletproof servo!
I had a plan to ask Flavio what servo he uses as a noisemaker, and then select anything else:)

andrew

:slight_smile:

Hi Andrew,
In this post I’ll add the last file for the Easy Rig III. Four pages 1:1 scale to be printed in A3.

To make the standard rig of approx 13 dm2 it is sufficient one carbon tube dia 4 mm for mast and boom and few other parts.
Now I’m preparing the 6 starting kits and a little bit of documentation about them.
I think that anyone that would like to share his experience with Easy Footy could post here.

In few days the Kits preparation job will be completed and I’ll have time to post the “Main construction guide”, first of all for the Hull, than Appendages, Bulb, Rig.
So my “Main Guide” could be completed by the personal experience of users.

Bye

Can’t wait to start following your build.

Terry

Hi to all,
this first step could be very simple and useless for the “old” Modellers, but could be useful for the new entries;)… so I decide to start really quite fron “zero”

Now we start the preparation of Easy Footy.
The first thing is study the drawings (see annex to prevoius posts) and put togheter the A3 sheets with reference of lines, trimming the top edge of the sheet to wire line
Here is the union of the drawings of the rig (nr. 4 A3 sheets)

Similarly we proceed with the nr. 2 A3 sheets of the hull, and so we will be ready to start: on the wall the two drawings of hull and rig, on the desk, the sheet of the development of all depron parts and, printed on folex A4, the transparencies parts.

Now we have to cut with a sharp knife (and a ruler where it is possible), all the shapes in paper of depron parts.

Note: on the side part has been added the position of bulkhead: 147 mm from the bow on the top and 145 from the bow on the bottom

Now we need a piece of a sheet of depron 3mm (1/6 of plate) size about 41.5 x 39 cm and we put on all our shapes as shown in the diagram

we draw all parts and cut out with the usual sharp cutter (the image representing the test kit that was just different in some proportion)

Now, reshape and sand the parts slightly to join the curves well and make the two sides parts, right and left, exactly the same, because it is very important not to get a twisted boat.

Now, with the utmost care, check first to have all parts we need and begin to trace the references you need for construction.
First, draw the sides parts a line 3 mm from the edge to which the label is flush with the battens and the main line of the bulkhead of the hull (the image representing the test kit that was just different in some proportion)

Then, placing the paper pattern on the workpiece and helping with a pin and a thin tip pen, is shown on the bottom and covered the position of the bulkhead, the centerline, the beginning and the end of fin on the centerline, the 4 edges of the “servos” hatch, the centers of the holes of mast steps and rudder. Finally, with the same plotting operation, track the centers of the holes and axes of symmetry shown on all the pieces of stiffening: 2 internal reinforcements of passage tubes mast steps, 2 ribs trapezoidal reinforcement mast steps, 2 internal reinforcements of passage tube axis rudder.

Now the pieces of depron kit will seem more or less like this (the image representing the test kit that was just different in some proportion)

After tracing, check again the drawings and all the depron pieces to make sure to have ready all the pieces of the hull.

Next step the hull assembly.
Bye

While preparing the pieces and the material for the course, I’ll post something to continue
Of course those who have experience with acrobatic aeroplane indoor RC (like Shockflier) or has already done boats “box” will not have much need of the following notes, however, who is the first experience with depron and UHU POR could draw some ideas.

Assembling and bonding Easy Footy Hull

Completed tracking of two symmetrical sides (one right and one left on the inside of the sides must paste the battens (2 per side)

Spread a thin layer of UHU POR and batten on the side

evaporate the solvent until the glue is sticky to the touch

precise positioning of the batten on the line drawn to 3 mm from the edge of the flank: bonding will be instantaneous

repeat this operation on both side of each joist.

Completed the first step you go to join the sides to the bottom with the help of the central bulkhead to be fixed temporarily with a couple of pieces of paper tape on the bottom and on the first side

at this point takes the second flank and approaches the first starting from bow: the 2 sides are joined together with a couple of pieces of paper tape

start fixing with 4 or 5 pieces of tape on the first side with the bottom as per photos

joined the second side with the same system as the first, the hull rests on the bottom and check the symmetry

Continue…

second part…


if everything is in place, it is time to glue the hull.
Falls off to one side, and with UHU POR, lies a thin layer of glue on the edge of the bottom and the bonding area of the side and central bulkhead

wait a few minutes until the glue becomes sticky and then closes the first side, securing it with paper tape into small pieces

disconnecting the second flank and one proceeds as for the first, always with UHU POR remembering to put a film of glue also between central bulkhead and bottom and bow on junction line of 2 sides

Closes the second flank tighten it as the previous

you put the hull resting on the bottom, to ensure that both symmetric and adjust any errors before the glue let us taking all

Now the hull is assembled, the next step will be the installation of the mast step.

Continue with step by step instructions to Easy Footy assy

Easy Footy - Assembly mast steps in the hull - third part

After verifying that the hull is “squared” with a ruler and a square face down on the construction plane: verify that the ruler right and left is at the same distance from the construction plane (if it does not touch the sides and supports up to have a symmetry as correct as possible)

[IMG] http://imageshack.us/a/img69/5721/pimg2267conloscafoappog.jpg [/ IMG]

Then insert the transom to check that no twist is in the hull and glue it into position.

[IMG] http://imageshack.us/a/img194/6789/pimg2266incollarespecch.jpg [/ IMG]

Then prepare mast step with 2 inner tubes 3, the spacer depron and two outer grips always depron as design developed parts taking care to finish it well squared

[IMG] http://imageshack.us/a/img844/1554/pimg2269assemblatii2tub.jpg [/ IMG]

Then bond reinforcement in transparent polyester tracing the bottom of the hull where positioned mast steps

[IMG] http://imageshack.us/a/img189/1997/pimg2265incollarelepart.jpg [/ IMG]

Note: glue transparent reinforcement also in the stern on the bottom where there is the exit of the rudder axis as per drawing (not shown in this picture)

Assemble the mast steps with reinforcement of bottom and deck with UHU Por

[IMG] http://imageshack.us/a/img842/637/inferioreaitubiscassa.jpg [/ IMG]

Insert the mast steps with reinforcements in the hull in the positions drawn on the individual pieces (without glue)
[IMG] http://imageshack.us/a/img266/5281/pimg2276posizionarerinf.jpg [/ IMG]

Measure distance from the bow of design

[IMG] http://imageshack.us/a/img51/2910/pimg2273ex4misuraredist.jpg [/ IMG]
and check that the distance of the tube aft from the bow to the drawing disti

Prepare for alignment with plumb for vertical
[IMG] http://imageshack.us/a/img138/8946/alberosiaperpendicolare.jpg [/ IMG]

and ruler to tilt fore and aft after inserting a tube 3 mm inside the mast step back and marked with tape to a point 300 mm above the deck

[IMG] http://imageshack.us/a/img841/3013/alberocz.jpg [/ IMG]

check the distances of a point 30 cm from the deck and from the bow and stern as per drawing.

Adjust the various parts to obtain the vertical shaft and the correct slope towards the stern, track references the hull bottom and sides to identify its location and then spread UHU Por on all surfaces to be bonded.

When the glue starts to become sticky, place the reference tracks and check again with the ruler and plumb position before the glue sets.
[IMG] http://imageshack.us/a/img338/4803/pimg2292primachelacolla.jpg [/ IMG

Finally bond with UHU Por the mast step with the two trapezoidal stiffeners between bottom and deck reinforcement.
Wait for the glue to dry and the mast step is placed and aligned.

This operation made with accuracy is fundamental to have the tree as vertical as possible in order to obtain a neutral behaviour even in conditions of very little wind: if the tree were hanging from one side may open the boom from the side where it is inclined and make the little boat governable.

more …

P.S. while I go ahead with the preparation of the kit for the course in school, I am preparing the 4 or 5 demonstration kits at various levels of prefabrication to bring to Model Expo Verona: tonight I cut various stickers I had in various formats
[IMG] http://imageshack.us/a/img824/1561/pimg2392.jpg [/ IMG]

To cover an Easy Footy is required approximately: a 33 cm piece of a roll off 60cm wide or 40 cm of a 50 wide

Continue with step by step instructions to Easy Footy assy

Easy Footy - Assembly mast steps in the hull - third part

After verifying that the hull is “squared” with a ruler and a square face down on the construction plane: verify that the ruler right and left is at the same distance from the construction plane (if it does not touch the sides and supports up to have a symmetry as correct as possible)

Then insert the transom to check that no twist is in the hull and glue it into position.

Then prepare mast step with 2 inner tubes 3, the spacer depron and two outer grips always depron as design developed parts taking care to finish it well squared

Then bond reinforcement in transparent polyester tracing the bottom of the hull where positioned mast steps

Note: glue transparent reinforcement also in the stern on the bottom where there is the exit of the rudder axis as per drawing (not shown in this picture)

Assemble the mast steps with reinforcement of bottom and deck with UHU Por

Insert the mast steps with reinforcements in the hull in the positions drawn on the individual pieces (without glue)

Measure distance from the bow of design

and check that the distance of the tube aft from the bow is correct

continue…

continue Easy Footy realization: step 3…

Prepare for alignment with plumb for vertical

and ruler to tilt fore and aft after inserting a tube 3 mm inside the mast step back and marked with tape to a point 300 mm above the deck

check the distances of a point 30 cm from the deck and from the bow and stern as per drawing.

Adjust the various parts to obtain the vertical shaft and the correct slope towards the stern, track references the hull bottom and sides to identify its location and then spread UHU Por on all surfaces to be bonded.

When the glue starts to become sticky, place the reference tracks and check again with the ruler and plumb position before the glue sets.

Finally bond with UHU Por the mast step with the two trapezoidal stiffeners between bottom and deck reinforcement.
Wait for the glue to dry and the mast step is placed and aligned.

This operation made with accuracy is fundamental to have the tree as vertical as possible in order to obtain a neutral behaviour even in conditions of very little wind: if the tree were hanging from one side may open the boom from the side where it is inclined and make the little boat governable.

more …

P.S. while I go ahead with the preparation of the kit for the course in school, I am preparing the 4 or 5 demonstration kits at various levels of prefabrication to bring to Model Expo Verona: tonight I cut various stickers I had in various formats

To cover an Easy Footy is required approximately: a 33 cm piece of a roll off 60cm wide or 40 cm of a 50 wide

During the construction of the first mini-series kit we found some small errors in the development of designs and the lack of any details.
So, we resubmit the entire package designs full of the latest fixes

concerning

  • bulkhead (flat development corrected in bottom 2.5 mm for each side)
  • Reinforced hull (rudder and shaft, flat development corrected in bottom 3 mm minus for each side)
  • Triangular reinforcements mast step (enlarged a little bit)
  • Holes mast step on the development of hull and deck
  • Dotted lines of reference for positioning the reinforcements (added)
  • Circuit mainsail downhaul (added)
  • Design of the bulb (geometrical measures added and shape refined)

Off course, if anyone finds something that don’t work, please, post it

Preparation of the fin in depron + carbon + transparent folex

here is the sequence to create a simple and lightweight fin for Easy Footy

0 draw parts that are removed from depron to enter carbon reinforcements

1 shape the front and back of the part in depron like drawing with abrasive pad: note, the part between the front and rear reinforcement must remain flat to allow subsequent bonding flat without twisting fin

2 cut away the parts that ahas to be removed where will be the carbon reinforcements dia 3 mm

3 bond carbon reinforcement with UHU Por glue and allow to dry thoroughly

4 check parts gluing and shaping

5 brush glue on transparent and allow to dry

continue…

follow…

6 spreadable glue first on one side of the part in depron drift, allow to dry and adhere the first trasparent part by pressing it at the center where the fin is flat and not press the curved side front and rear where the depron is shaped

7 spread glue on the second side, let it dry and then superimpose the second coating trasparent part on a flat area and leaves to be bonded the curved side front and rear where the depron is shaped

8 to stick on the central area between the two carbon reinforcement coatings pressing down then pick up the fin

9 with the part in hand, pressing his fingers to stick coatings without twisting fin on the curved front and then the rear: Be very careful in this operation when you have a few moments to correct any errors and / or twisting

10 comes over and compared with design

11 fin weight: 11 grams

The fin is very light and flexible a little: with 300 grams of bulb, locked like in the hull, the fin flexes about 10 mm
The lower end of the main tube is inserted into the bulb when boat is completed; in the extreme top of the tube will be inserted the U-shaped steel wire which will serve for passing the sheet on the mainsheet.

Bye

Claudio, this is really great work…your plans are outstanding. I’ve never done a plan so detailed, because it’s a LOT of work! With your permission, I’d like to publish your plans and turn this thread into an article for our Footy issue of the AMYA magazine this fall.

Thanks…Bill

Hi Bill,
Thank you very much for the appraisal of our work.
Now I’ve made the complete photo-sequence of realization in Italian and, when I’m not too much busy, I’m preparing the English translation for this forum.
The plans was made in “team” by various Email and draft release with mine friend Camillo Giammarco that makes those final beautiful and clear drawings: please don’t forget him :wink:

If you want to publish them into an article for your Footy issue of the AMYA magazine for us is OK. Camillo is preparing an english version and i suppose it will be ready soon. If you want, send me a pm and I’ll put in contact with him.

When the “English plans” will be ready could be also useful place it in the dedicated page http://footy.rcsailing.net/plans.php with also a link to this thread for a quick realization guide.

Now we are working about, but I hope that in summer will be ready a new Footy Italy interner (the name it isn’t yet defined) for all the Italian competition, technical article, boat evolution and so on about the footy with also any content coming from my actual site Progetto-Urca http://www.progetto-urca.com/urca/progettando/URCA_Footy/costruendo/index.htm
Any news soon.
Bye