Have been working on this boat for a few weeks.
It’s a slow build due to my work and the fact that it is kit number 3.
No written instructions or drawings yet. Brian is working on this.
I have found a couple of problems with his CAD drawings which he
has told me he is rectifying for future kits.
The laser cutting and balsa is very good.
Also He has included lots of nice Graupner parts for the rig, as well
as all carbon tubes needed, and some other bits that I don’t even
know what they are for.
I will start posting pictures soon.
Anyone else putting one of these together?
If so, you are welcome to participate.I could use some help from
fellow boat builders.
Hi…
My kit is #3 of the first run of 6 that where laser cut.
I did find a couple of problems with this first run.
These are small and have to do with refining the CAD
files after revisions were made.
I have bene in contact with Brian, and he is busy working
on this.
Had a good conversation with him over the phone the
other day, and can say He is making every effort to make
this kit successful for the builder.
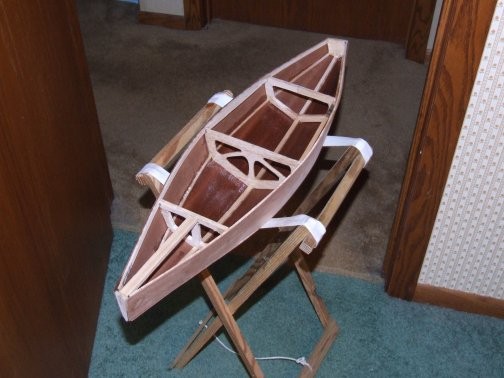
So anyway we get started with the kit.
It consists of a building jig of balsa set on a good straight
base. I used a piece of shelving material.
Then you add the bulkheads and go from there.
Sorry, left out a step.
There was no hole in bulkhead # 4 to fish the servo wires from the
sail servo located in front of it to the stern.
I sharpened a piece of 3/8th" brass tubing by sanding the outside
of it lengthwise with 80 grit sandpaper to give some teeth.
Then twisted it to make a hole.
I guessed on the location.
Kurt,
I am in the process of building Simpatico kits 1 and 2 also without plans. I do have a couple of recommendations. 1st. the stern profile before you get to far along I would suggest that you take a scrap of 1/16 skin ply and cut out a stern bit that you use to re-enforce the stern profile. If you remove the cutouts for the optional keel supports be sure to re-enforce the remaining profile area with some scrap balsa glued in place with the grain rotated to the profile. I would also suggest supporting the bow profile with some scrap as well. that profile is narrow and will break away prematurely when you start skinning the boat.
I am working on technical drawings and instructions for these kits. I have some of it already completed and will forward any files I have upon request. Builds are looking good!
I am glad to see intrest in my build log.
I am relatively new to r.c. sailboats and this is my first wood boat.
My experience is mostly r.c. aircraft, and I have experience with
getting a design from a CAD drawing to actual laser cut parts.
It is not as easy as you would think. Allot of weird things can
happen when you make revisions to DXF files and then convert
them to file type that the laser cutter sees.
I don’t know how far along the rest of you are but here are some
things to help you out.
the doubler that attaches to back of station #4, did not render
correctly in my opinion.
I will attach pictures that I hope will explain.
Brian told me he is fixing this on future kits.
I cut 2 very straight pieces of 1/8th" x 1/4" balsa and noticed a
discrepancy. I simply cut the doubler in half and fit them in
after the deck stringers were glued in.
(See pictures.)
2.the mast box needs to be trimmed by 1/8th" at the backside to fit
correctly between station #4 and #5, easy fix
3.the keel stringers that include the rudder locating position did not
render correctly due to last minute changes in the design.
It’s about 1/8" long.
Trim the front end of it to fit,easy fix
I have spoken to brian about these issues and he is working on corrections
on future kits.
Just a personal opinion/observation -
There seems to be a lot of wood and weight in just the stringers and bulkheads. Granted mine is a 4 panel instead of a 6 panel (only 2 less stringers) but my “MORNING WOOD” project used stringers for gunwales, chine location and keel and 3 bulkeads that were significantly cut out to eliminate weight.
For hull panels I used mahogany veneer (0.020 inch thick) and epoxy coated both sides and I feel the hull is more than strong enough to handle any stress from sailing. This one (#4 of four) will be my first swing rig. Deck of similar veneer thickness but Birds Eye maple - again coated each side with epoxy.
Yes it might be over kill but it makes for a light hull. Mine with all skins on it weighs in at 150grams. So still very respectable and very strong. This hull shape is also more complex than the JIF. I need the frames to get the panels to do what I want.
Frames are 1/8" balsa and skins are 1/32" ply. Skins will just need some sort of waterproofing, no fiberglass needed.
Dick…
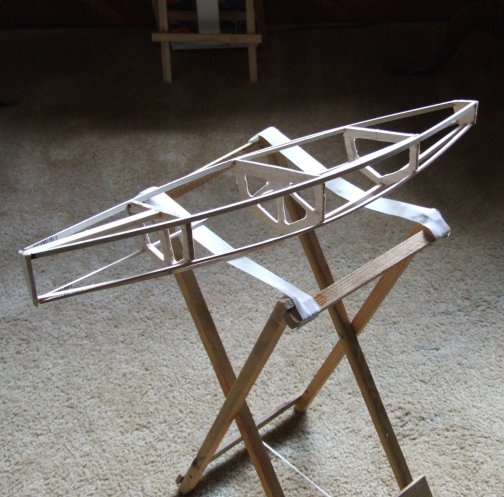
Allot of the balsa you are looking at in the pictures is actually part of the building jig.
I suppose it could be planked with lighter material like 1/64th" ply, but the cost would
go up.
At my local hobby store a 6x12" sheet of 1/32nd" ply is 2.66$, the same size sheet of
1/64th" is 7.99$.
It could even be skinned with styrene,( crazy idea ?)
I don’t plan on using any epoxy (exceptions being the fin and rudder) there are lighter
alternatives to seal the wood.
I looked at the Jif plans, and think Brian’s boat is WAY sexier.
This is “MORNING WOOD” with the stringers and sheeted in veneer.
Another view during panel layup and attachment
The bare bones and skeleton of “MORNING WOOD” before veneer layup.
Originally I had build a 4 panel deck house that sloped forward to bow, but have since scrapped it when I made decision to go with a swing rig - allowing me to keep the bottom of jib and main much closer to the deck.
Sorry that my build has slowed to a crawl.
My workplace just got hammered with new orders and I’m on 50hr. weeks.
Today I received some new laser cut parts from Brian, for servo attachment.
We had spoken about the idea of using the GWS S125 1turn servo, but it
looks like this servo does not deliver a full 360 degrees of travel.Will hold
of on ordering one for now.
I will procede with the build and ad the new servo mounting pieces after
I finish planking the bottom of the hull and free it from the building jig.
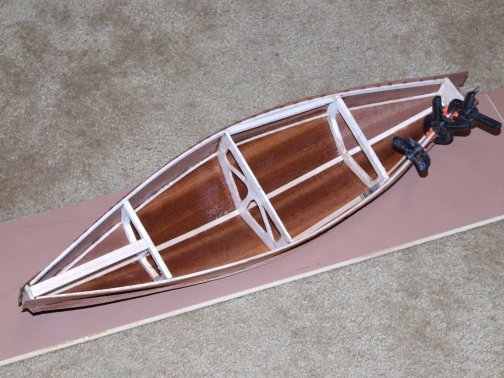
I add a picture that I took before starting the planking, at the bow
and how the stringers come together. You can see buy the shape of the
bulkhead how the 6 planks come together. Hope I did this correctly
On the servo issue. I am looking at the 3T now. It is digital and has more torque and will provide the right amount of travel. They are $25 versus $18. Not a bad jump. I am going to make another tray for an optional arm type setup. It will simply be offset to one side so that the arm lines up in the right place.