mike,
you could always use the claudio tool to make sails, once you find something that works, then use the claudio tool to help you fabricate a block. if you wanted to stay with blocks…
mike,
you could always use the claudio tool to make sails, once you find something that works, then use the claudio tool to help you fabricate a block. if you wanted to stay with blocks…
Well, close, but no cigar. The shape might be closely approximated by a parabola, but the actual shape of such a beam is a cubic equation. Someday soon I might look at using cubic splines to model sail shape, then use those splines to calculate the additional material added at seams to produce the shape, and finally use the latter to determine how to bend the beam in a Claudio-type gadget to produce the shape. The concept is simple enough, and even the programming may not be too terribly difficult, although it’s been a while since I did much of it.
Mike Biggs
another question…
on smaller sails like a vic or an RG it probably does not matter. on larger sails it may. when you make the panels. do you want the seam Perpendicular to the luff, or leech… I have made my vic and RG sails perp to the leech. but I just finished drawing a set of A rigs for my ec12 and put my seams perp to the luff… not really thinking about until I printed them out and said…“HMM that doesn’t look right”
FWIW I’m making a suit out of CPM505 if it matters.
i went back and was messing with the seam locations… perp to luff or leech. when you change the what the seam is perendicular to, changes the draft location. I had a 50% line running through each seam and when I added int he new seam perp to the leech, the 50% draft moved towards the luff about 8mm
in my latest sails I have been putting the draft 35% aft of the luff… I’ve been doing some more reading…and I realize that 40% is most common, but its 40% from the leech…
so basically I’ve been putting my draft too far forward???
The victoria has been sailing well… and my though process for having it at 35% from the luff is that we sail in mostly light air… so a lower speed fuller “wing” with the draft forward would be better for more lift in the light air???
Seams were traditionally cut with the seams perpendicular to the leach to limit the stretching of the leach. With modern film the stretch is the same in every direction so it doesn’t matter. You could have your seams running every which way. As to the draft location-I dunno.
Don
Definitely use the tape. Get it as thin as you can. Too much material overlap makes the sail too resistant to popping through.
I’m using tape as well on my 6 footer with no issues, it does require film/film fabric though for the best bond.
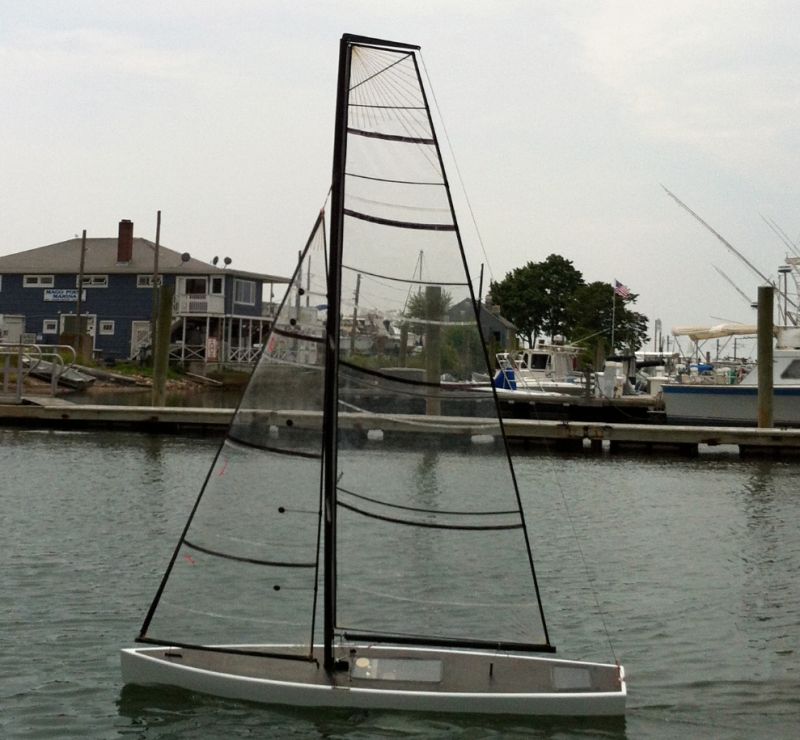
Here’s a shot of my “A” sail for 0-11 knots, 2 mil mylar.
Designed with “Sailmaker” and cut on a plotter. http://www.sailscience.com/
clear sails, gotta be hard to read when on the water… I should have taken pics today of Ec12 with the new sails… well I gotta put new shrouds on the rig so I’ll set it up and take some…
neatloking program, doesn’t run on windows though…
Yes the clear can be a little tricky to read at times. “Sailmaker” runs on OS 10 sorry no Windows.
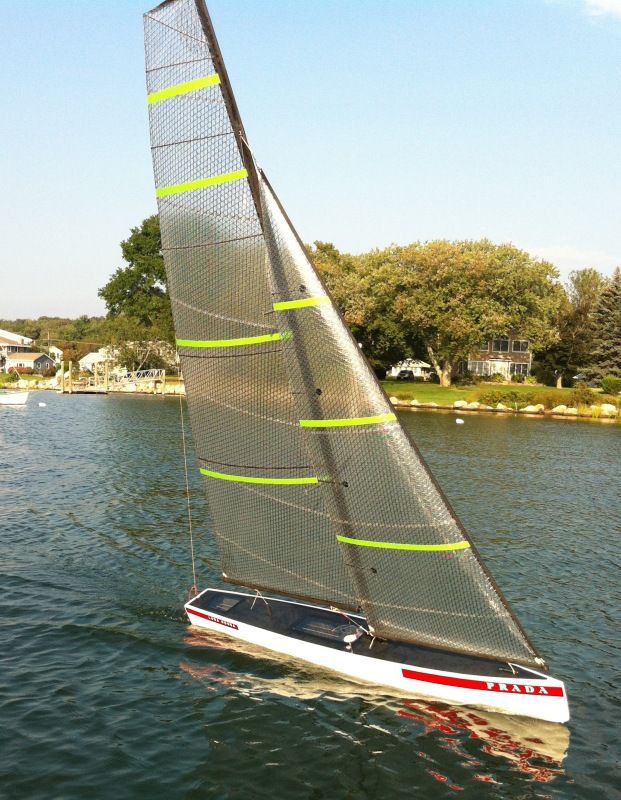
here are some pics of my cpm505 sails… sailed well enough…on saturday to win a few races…so they work…
the wind was not being cooperative when I was taking the pics… no matter how I moved the boat the wind seemed to try to thwart my picture taking…
Very cool, is it an EC 12?
Here’s a shot from some light air testing today, new “A” range designs in action
yeah john,
ec 12 big fat slow keel boat… but ever so graceful as she glides through the water…
what type of material are those sails…and is that 7 panels on the main??? wow…
does your sail software print the panels in cad , ect…
Cool I like EC’s, went to the EC 12 event in Mystic CT a few weeks ago.
The fabric here is a 1oz material made by Contender, not a standard item.
Yes 7, they are pretty big sails (mast is 94" off the deck).
I have to check, its been a long time since I did anything other than send a Sailmaker file right to the plotter. 99% sure it can.
Never been to mystic would have loved to go and sail the 12 and watch the J’s as well…
what is the pricing like on the contender cloth… not that I need any material. I have enough of various forms of Trispi, 505, PX75, Cuben fiber, and nylon…always neat have a new source for unique material…
Ive been using a claduio tool and guessing…for the most part. I need to try to build a sail in sailcut and see what happens…
not sure how it would turn out. but worth a shot… I guess plot it and assemble the paper and see what happens…
i know I could duplicate the sail I just made since I wrote everything down…
do you use a sail block, or do you just match the seams up based on how they were cut…and stick em together
I do not recommend building a sail for a model boat using Sailcut unless you also use a mechanical aid to assist in joining the panels. Trying to align and fix the panels while they are lose is not accurate in our small sails. The subtleties of the panel set by the software are lost by inadequacies introduced by joining the panels together.
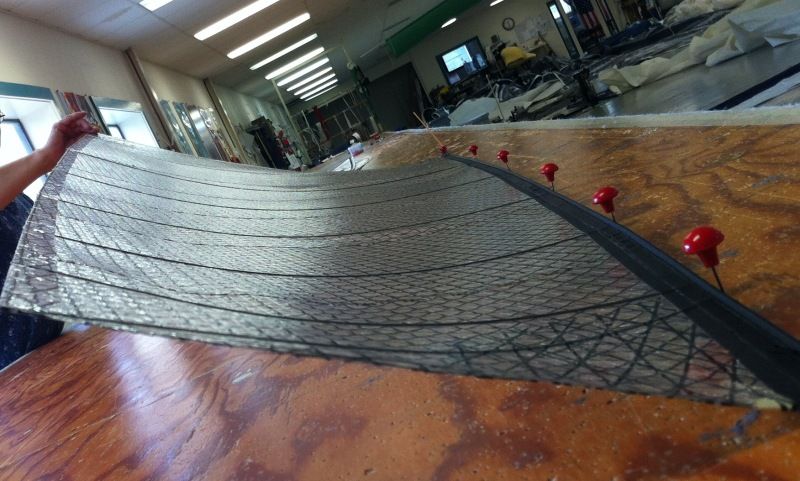
I have had good success by using Sailcut as a tool to develop a template for a panel curve, which I then use to set the shape of the Claudio Gadget. I explained the process earlier in this thread (look for my posts around May or June 2006 I think). I have always meant to do some math to support the practice, but that remains on my “to do” list.
I guess by most standards I’m cheating, I design sails for a living models are for fun. All of my sails are designed using Sailmaker and cut with the laser plotter at the loft.
It’s a very cool way to do it as the combination of the two is super accurate and allows to fine tuning of the designs.
For reference the max broadseam offset in the mainsail shown earlier in 2.5mm.
A shot of the main in my previous post looking down from the head.
absolutely beautiful john…Know any one who wants a sailrite sewing machine…trying to get rid of mine…can’t use it on these small light weight sails…
Muzza,
you think I could cut the panels as you did and then use the claudio tool or sail blocks(which I don’t own, yet…) to help assemble. I read your post on page 31… did you have reproducable success???
Yes for the Claudio tool - I feel I have been able to repeat my results. It took me three mainsails before I achieved the standard I was looking for. Be prepared to throw your first efforts away.
Larger sails are easier than smaller sails. The smallest boat I have made sails for is the Victoria. I found a jib that small quite difficult to make because of the very small tolerances necessary in the panels. This is the beauty of using a template to set the shape of the tool. You need a a good flexible batten and multiple wedges - not just one each side of the batten pivot.
Great care is required to be sure that the point of maximum depth is consistent as a percentage back from the luff (if indeed this is a design objective - it may not be - in which case care is required to be sure that the maximum depth is where you design it to be).
Drifting off the subject (and probably repeating myself), you can develop your designing and sail-making skills very cheaply if you have the time. I have made sails out of cheap cellophane which costs almost nothing to buy. I use it to build prototypes. It tears easily and is throw-away after a couple of trips to the lake, but it allows you to prove your designs and sail-making skills before you commit to an alternative (and expensive) fabric/film for the “live” version. The six hours it takes to build a set of throw-away sails may seem like a waste - but for me it is education for less than the cost of a bottle of wine.