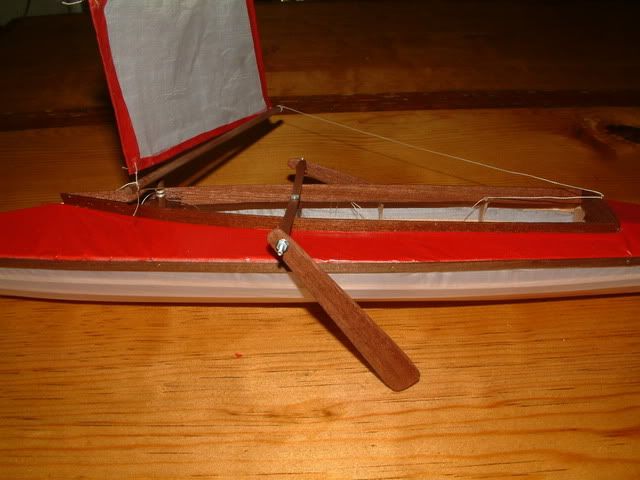
I’ve decided to publish the design for Switchblade, the hull I sailed in the Raleigh regatta. It will give people a bit more sophisticated option than Razor. There’s a couple of pics in another thread somewhere.
The plan will be like the one for Razor…all the panels will be outlined, and I’ll provide pics and suggested locations for mast and fin, but it won’t be a detailed building plan.
I have a Freeship file that plots all the panels, but I don’t know how to change that to a format that can easily be printed without Freeship. Someone took similar files for Razor a few years back and converted them so they could be posted to the Footy website.
if you have Adobe Acrobat, you can, when selecting your printer, choose that product (choose printer=Adobe Acrobat). This will cause your file to be printed into a PDF format which can then be emailed, printed to exact size, etc.
Unfortunately - this forum doesn’t like PDF files as they are usually too large in file size.
I have pdf creating capabilities if you need some help with it. I’m also pretty interested in your design as I’m having trouble with the assembly of the razor, mostly due to the ply being too thick.
Thanks for Razor
If Switchblade is as attractive and effective the footy world will be grateful
go4broke44 - use thinner ply!
Sorry to go for the obvious - the ply to use would be 1/64th max (and no bulkheads) as the Razor is a beautifully curved design which gets its shape and stiffness from the seams.
As always, tape it together, dab spots of white glue (PVA) (or better still hot met glue or balsa cement) on the inside, leave to dry overnight - remove tape and then glue a porous tape down the inside of all the seams
Tape can be tissue, bandage, blenderm, or my favourite, horticultural fleece
Glue on with any glue - preferably PVA, or if you must, Epoxy with a little microballoons added for lightness.
Yeah in retrospect that would have been the smart play, when I was at the craft store it seemed like the 1/16 would be thin enough, and the 1/32 seemed really thin. I was also in somewhat of a fog from the night before, so mistakes were made. Next time I’ll get the right stuff, for now though I’ll keep trying to muscle the 1/16 into shape!
You wondered elsewhere about soaking ply to soften it - marine or good quality birch ply (which this will be) can be boiled, soaked in hot water, steam heated (over a steamer) or heated any other way - its the heat, not the water that makes it pliable
When it is soft and flexible bind it over something with a good curve in it drainpipe, glass, or indeed anything and either leave overnight to dry of put in the microwave for instant drying, setting of the curve (do this carefully, thoughtfully and safely)
While pondering the flexibility issue I had a BFO - probably you have cut templates by pasting the patterns to cardboard (in the UK always cereal packets by long tradition).
Build the boat of the card patterns using hot melt or PVA glue - paint, varnish or epoxy outside - Voila, Un Rasoir! Zut Alors, c’est magnifique, ca
Not familiar with Freeship in detail - Does it have an option to export the output in any familiar formats?
I’ve got another 3 of so Razors in process of building, but would happily change course if Switchblade tempted me.
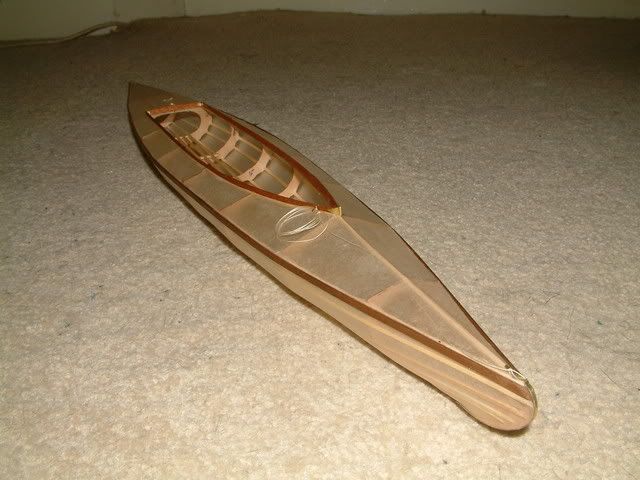
One of the Razors is in acetate - as in OHP slide material. I contemplated the discussion started by Angus about visibility and decided that a transparent Razor assembled with Magic tape and mylar sails would be fun. Does anyone, I wonder, make transparent Carbon fibre?
Thanks for the tips, guys. I’ll try to make the plan available this week. It’s a double chine with a pretty sharp bend required at the bow, so it’s a bit harder to build than Razor.
With regard to Razor construction, or Fatbob, or any of my chine designs…I build using balsa. It’s a bit harder to handle than ply, but it’s nice and light, and after building 6 or 8 hulls, I pretty much have it down.
I use 1/32 or 1/6 balsa…sometimes both depending on the stiffness I want. I glue the patterns on the balsa with spray adhesive, then cut out the panels using a scissors.
After removing the plans from the panels (label the parts!) I soak them with 409…a cleaning agent that contains ammonia. Then I prebend the panels and clamp or band them to hold the approximate shape. This isn’t to get the shape exact, just to get a good start on the bend to make assembly easier.
When dry, I tape the panels together on the outside of the hull with lots of masking tape. I’m careful to butt the panels closely…this is where the hull takes shape. Once completely assembled with tape, I put a couple of crossmembers to hold the sheer to the right shape…then I run CA down all the seams from the inside of the hull. Be generous with the CA and it will give the seams good stiffness.
Take the tape off and sand the hull (lightly!!) to clean it up and you are ready for the internal stuff.
It’s a fast and effective approach…I built a new hull in a few hours yesterday afternoon.
That said, I like to learn new tricks…so I hope anyone who has a good tip on their favorite methods will share with us.
CA is amazing stuff. In my experience it becomes brittle with age and will fail if it is used exclusively at stress points. My main use for it is to tack parts together that will later be permanently bonded with epoxy. Most new builders use way too much epoxy to glue parts together. My guess is that they are mostly used to using Elmer’s white glue or some other household glue and assume that more is better for a strong joint. That is why a lot you guys have the impression that epoxy is too heavy to use.
In addition, blending micro-balloons into your epoxy mix both weakens the epoxy joint and guarantees that you will use more epoxy than necessary. There is a filler made by West System called “410 MicroLight” which is much lighter and less dense than than micro-balloons. I use MicroLight for fillets around the keel fin joint inside the hull before adding the glass reinforcement strips. If you want to put a fillet between the keel fin and the outside of the hull or between the keel fin and the bulb Microlight is the lightest filler that blends with boatbuilding epoxy. Its purported to be made from expanded epoxy resin (sort of like puffed rice) so it chemically bonds with resin. It is also sort of Balsa colored for you folks who want a “natural” finish to your fillets.
MicroLight can be mixed with epoxy to any consistency thats needed, from runny to stiff like whipped cream. The stiffer the mix the more likely you will have air-bubbles trapped in your application (same is true for micro-balloons). You will find these when you sand the filler back once its dried. In some applications this is okay as any air bubbles can be filled with more Micro-Light/epoxy mix. For a use that requires restricting the flow of your filler, say on a vertical surface (the term is thixotropic) you may want to add a small amount of West System #406 Colloidal Silica or similar product. One note of caution though, Colloidal Silica is carcinogenic (like asbestos fibers), Balsa also contains silica, Ca glue fumes can cause lung damage, and I can’t imagine that MicroLight is a benign product either. Boat building should be undertaken in a well ventilated area, away from children or pets and not in your living quarters. Please work sensibly and safely.
That said, MicroLight and Colloidal Silica are widely available through boat building suppliers that carry West System products.
CA is amazing stuff. In my experience it becomes brittle with age and will fail if it is used exclusively at stress points. My main use for it is to tack parts together that will later be permanently bonded with epoxy. Most new builders use way too much epoxy to glue parts together. My guess is that they are mostly used to using Elmer’s white glue or some other household glue and assume that more is better for a strong joint. That is why a lot you guys have the impression that epoxy is too heavy to use.
In addition, blending micro-balloons into your epoxy mix both weakens the epoxy joint and guarantees that you will use more epoxy than necessary. There is a filler made by West System called “410 MicroLight” which is much lighter and less dense than than micro-balloons. I use MicroLight for fillets around the keel fin joint inside the hull before adding the glass reinforcement strips. If you want to put a fillet between the keel fin and the outside of the hull or between the keel fin and the bulb Microlight is the lightest filler that blends with boatbuilding epoxy. Its purported to be made from expanded epoxy resin (sort of like puffed rice) so it chemically bonds with resin. It is also sort of Balsa colored for you folks who want a “natural” finish to your fillets.
MicroLight can be mixed with epoxy to any consistency thats needed, from runny to stiff like whipped cream. The stiffer the mix the more likely you will have air-bubbles trapped in your application (same is true for micro-balloons). You will find these when you sand the filler back once its dried. In some applications this is okay as any air bubbles can be filled with more Micro-Light/epoxy mix. For a use that requires restricting the flow of your filler, say on a vertical surface (the term is thixotropic) you may want to add a small amount of West System #406 Colloidal Silica or similar product (Cabosil used in pottery glazes). One note of caution though, Colloidal Silica is carcinogenic (like asbestos fibers), Balsa also contains silica, Ca glue fumes can cause lung damage, and I can’t imagine that MicroLight is a benign product either. Boat building should be undertaken in a well ventilated area, away from children or pets and not in your living quarters. Please work sensibly and safely.
That said, MicroLight and Colloidal Silica are widely available through boat building suppliers that carry West System products.
I’ve actually build models like this, I was toying around with a full-size developmental class: the 6ft skiff, and I made a 6" model using cardboard and hot glue, and then sealed it with some primer spray paint. I actually plan on skinning one of my footy models in this manner, right now its just a wooden skeleton.
Another nice thought is the ‘kayak’ or ‘curragh’: Take a skeleton whose surface elements are all stringers (i.e. fore and aft), Apply one of the very tough model aircraft coating materials as a skin. I personally would use carbon tubes (say 1 mm) for the stringers as it is difficult to make them anything but fair. If anyone would like to give it a go, I have a nice half-developed design that relies on a bow tansom. stern transom and a single central ring frame. In theory it’s very light and easy, but I don’t have the time to find out.
I was pondering this type of construction the other night as I was drifting off to sleep. I think I have enough “scrap” materials laying around from keeping my sailplanes flying to put one together for free. I’m a rank re-beginner to sailboats so I would need some technical guidance (rig, rudder, keel, etc.) but I have built many kinds of models over the years so the actual build is not a problem. In other words, I’m willing and (mostly) able. If you are willing to share PM me the info and I’ll give it a shot.
Some of you may recall I made a Footy with a cardboard hull. It worked, but it’s more difficult to seal the edges (which will wick up water) and the cardboard I have is heavier than balsa.
Interesting idea, Angus…since I’m kinda into chine hulls, I’ll give it some thought. Trick, or course, is to keep the frame light enough to get the benefits of the lightweight skin, but strong enough to be handled.
Thanks to all others for the tips about the plans.
Is this hull the same as your new Cobra design? Scott had one of your Cobras at the pond on Thursday, and claimed it was faster than his American Footy. All the more reason to publish the design.