Making a Carbon Fibre Fin - Help

Hoping to get some help here in CF fin/rudder making. Are these the steps -

1. Sandwich balsa 1.5mm thick with carbon fibre to make a laminated blank. i.e. 3 sheets balsa and 2 sheets CF.
Question - do I use glue here or epoxy resin? Has the CF already been coated in epoxy resin to harden flat?
2. Cut blank to fin shape then sand.
3. Finish with outside coat of CF sandwiched in foam / wood panels and clamps.
4. Final sand.
Question – do I need to use CF inside laminate or will just outside skin be strong enough?
Any other methods? Like making a mould… links would be good too.

thanks for your help.

Larry

Do a search for Claudio’s AC boat builds. He details (in photos and info) how he makes his for these “big” models. I think it is under “New CLasses”

Dick

ADDED - Should be somewhere in this thread… GREAT BUILD INFO !!! regardless of size of boat.
http://www.rcsailing.net/forum1/showthread.php?4991-IACC120Cup/page11&highlight=ac120

Larry,

There are various methods for making a one off Carbon Fiber fin. To offer methods I would need to know what size of boat, the lead counterweight weight, and the length of the fin. But, just a point of reference, don’t use Ca in fabricating fins or rudders. Ca has a limited effective life and tends to get brittle and fail under load. Also, anything larger than a Footy fin and you would probably pass out from the cyanide fumes that the amount of Ca you’d have to use would emit.

Dick,
thanks for the link to Claudio’s build. I have read it a while ago. He also has info somwhere on the IACC120 dual build thread re fin making.
Niel,
I’m making fins/rudders for IOMs. Thanks for warning on using CA. Don’t think (at the price) I’d ever pour out that much…

Claudio’s information is the best I have seen but he does use three different composites. 1. Balsa only with CF skin. 2. Balsa/glass middle/alum strip and CF skin. 3. Balsa/CF composite.

Does everyone make fins the same way as Claudio? Or no fin makers have read this yet.

At the moment - my rudders are good. Don’t use CF on them. Very light and strong with a simple bent rudder post epoxied into slotted cutout.
My keel fins are too weak. At the correct profile need to be much more rigid. So this is where I want advice. How are people making IOM keel fins?

Larry

Larry
All you really “need” is a lay of 1 or 2 oz uni-directional carbon on both sides of your fin to minimize bending. Nice to have is a lay of carbon cloth on the diagonal on both sides to resist twisting. How you build the body of the fin is up to you and whatever method you think is simplest and most accurate(read symetrical). If you use two or three layers of balsa you are wasting your time putting CF between the layers(to my way of thinking). It adds virtually nothing to the strength being too close to the center.
I made a plug from plywood, made a mold from it. Starting from the outside of the fin I put a lay of light carbon(for appearance mostly), then a lay of uni, then a lay or two of 5.8 oz carbon. When that is just tacky I fill each half with epoxy/microballon mix and clamp the two halves together.
Don

Thanks Don,

my mold making is not that good that I could do one for a fin. Just barely have a decent mold for my bulbs. Will try the simplest method. Laminate balsa blank epoxied flat. Cut to shape and sand profile. Then CF skin. Might include aluminium strip as per Claudio’s method. To give centreline and straight edge. Also might add some strength.

Don, any photos of mold making? I’d give it a try if I was more confident. Also, silly question, how do you flip the mold to join 2 halves without filling pouring out? Hard to visualise.

Larry.

Larry - The amount of work that goes into making a mold for a fin is only justified if you are intending to sell a bunch of them. In which case you will probably have to go with a two stage epoxy and either an oven or a heated mold with a rheostat to control heat gain. Things get much more complicated when customers get involved because they expect professional results when they pay for things like fins, even though they probably have no idea what goes into making them up to par, or why they are so expensive.

If you want to race your IOM then you would be better off buying the fin from a professional IOM builder, because you would get a product that is superior to anything a hobbyist could make. If you just want to tool around your pond and are not interested in competition then making your own one-off fin makes sense, both economically and to hone your building skills.

The method I would use is a sandwich of carbon fiber cloth and balsa. Choose the balsa thickness depending on the chord of the fin. Two sheets of balsa on either side of two layers of 6 oz. cloth. The balsa sheets should be cut roughly the profile of the fin, a little larger all the way around. The sandwich should be laid up with only enough resin to wet out the cloth and to cover the inner faces of the balsa sheets lightly, enough to sink in and give the surface of the balsa a light sheen. I wet out the cloth pieces separately on a piece of wax paper and apply them individually to the lower balsa sheet and top off with the other pre-wet balsa sheet. If you want to add a few strips of unidirectional carbon, wet them out and then apply them between the carbon cloth pieces. I clamp the sandwich between an inch thick plywood board and the bed of my tablesaw, but two straight boards would work too. The results should give you a fin blank without epoxy drips or epoxy smears on the balsa (which make it harder to shape). This blank also has the carbon as a convenient centerline to sand your chord to.

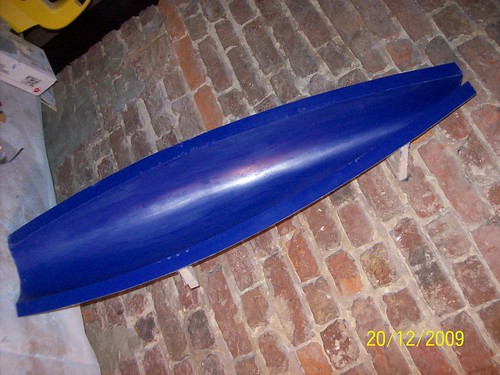
Skinning the fin is where my method varies a bit from what most people do. You can try to lay-up carbon cloth over your blank directly, but I’ve found this way to be messy and very hard to control. It also ends up with a heavy fin because you need to fill up the weave after it is cured. There is a lot of sanding involved to get a smooth finish and more than likely you will sand away some of the carbon, the stuff that gives your fin strength! I cast pre-curved skins in carbon that I attach to my faired fin blank. These pre-curved skins are laid up on the inner surface of a large planter (an old broken one from my container garden). The greater the diameter the better, my planter is 23 inches across the top and tapers just slightly. In spite of being used it has a very smooth interior surface (and without ridges, very important!). I’ve also used a sheet of tin, actually a length of straight tin ducting that I cut along its seam so that I could spread it a bit for a larger diameter. I’m sure that there are many ways to achieve the desired end, which is to have pre-curved skins to laminate onto the fin blank.

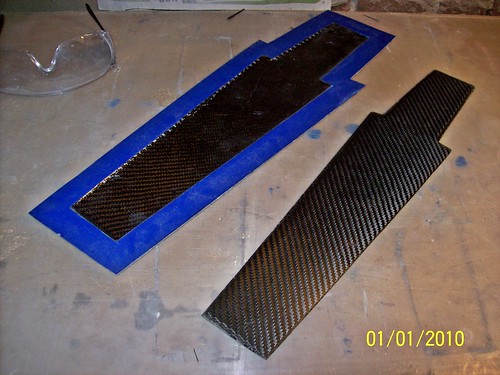
When I do the skin lay-up I usually use an outer layer of sheathing glass and an inner layer of 6 oz. cloth. The sheathing glass allows you to score trim lines onto the skins. These will show up as white against the black carbon cloth, making it much easier see where to cut the fin’s profiles. Once the skins are cut to the fin profile the inside faces of the skins should be roughed up with course sandpaper and cleaned of any dust before they can be laminated. Next the trailing edges of the skins are taped together. The taping should be done against a flat surface. I usually alternate sides as I tape along the edge. The critical part of this procedure is to make sure that the taped edge is dead straight. It is very easy to impart a curve or a scallop in the tape job and it may take a couple tries to get an acceptable trailing edge.

The skins should fit around the faired blank so that once the trailing edge of the skins is in place over the trailing edge of the blank the leading edge of the skins is just even with front end of the blank, or just past. You don’t want to overlap the leading edge of the blank because when the skins are laminated on they will be taped tightly together around the leading edge, too much skin in front of the blank and the tape can impart a buckle into the skins and cause a void between the skins and the blank (this will weaken the fin). If the fin is tapered then as the skins are laminated in place they will have to be taped over the top edge so the blank doesn’t start to slip out during the process.

After some practice fittings to make sure everything will work smoothly its time to laminate the skins in place. I would recommend that you start out with a straight trailing edge in your fin design. With a straight trailing edge the taped-together skins can be butterflyed open to apply epoxy to (much easier than getting resin into the cramped space of two skins partly pried apart). The blank is also wetted out, again apply only enough epoxy to form a thin film over all surfaces (there won’t be much if any absorbed, you don’t want a lot of epoxy oozing out all over the place). Carefully fold the taped skins over the blank making sure that the trailing edge of the blank is as far back as it can go without spreading the skins apart. Hold the blank in place with one hand and smooth the skins forward over the blank with the other. Have a paper towel handy to wipe away excess epoxy that may ooze out (you want a “dry” layup, just enough to attach the skins to the blank). Once the excess is wiped away start taping the leading edge closed (its a good idea to have lengths of tape pre-cut and handy). I usually start taping from the middle and work my way to each end, alternating directions as I go. Once the leading edge of the skins are taped up there should be a gap at the front between the skins (1/16th" to 3/32" is good). This gap will later be filled with epoxy thickened with graphite powder and faired to a nice blunted edge. The last step is to tape two straight pieces of wood to either side of the trailing edge of the fin’s skins. I apply pressure to these strips with light hand clamps. The idea here is to flatten out the aft section of the pre-curved skins (remember they are formed on the inside of a circular form and the fin should be some kind of airfoil). This will in turn push the skins forward a bit so make sure that the taped leading edge doesn’t distort the skins. If there is a problem you may need to re-tape in places to reduce the “closing” pressure.

I mask the outside of the skins before laminating just to make sure I don’t get any excess epoxy on the surface. In most cases the release agent residue will allow any spots of epoxy to be scraped off with a razor blade.

Rudders can be made the same way although the carbon center laminate is omitted. Actually, except for a center spline of balsa and a leading edge strip of balsa my rudders are hollow.

I hope this is clear. It will give you a light weight, strong, and cosmetically professional looking fin.

you really should seal your balsa wood if you are compressing the carbon (whilst the resin is still wet) between the balsa otherwise you risk the carbon not having enough resin.
if decide to cover the balsa in carbon, use peel ply (as the last layer of the laminate) so you don’t have to fill any of the weave (once you peel it off), it also gives you an easy to sand surface and it also stops you putting too much resin onto the job

Niel,

thank you very much for your information. I really appreciate all the time you have spent describing your fin making process. I love the idea of having a premoulded CF skin ready to lay over a faired blank. Taping, butterflying, all steps described so even I have followed. Will give this a try as soon as I can buy some CF. Like the idea of sheet metal curved to profile. So elegant and easy. Cover curved metal in packing tape and then wax. Do one sheet of 3 layer CF at angles. Wet and let cure then cut to profile shape. Then continue as per your steps.

By coincidence I have just returned from a sailing club members place looking at his various CF fins. Bantock, Brad Gibson etc. And the best, we think, made by another club member, ‘old-timer’ who sadly can no longer do the work himself. Arthritis. His last fins he was also using vacuum bagging.He has an old hospital vacuum cleaner he found as junk that barely works. But perfect pressure for a vacuum pump. He was selling his fins to club members. Very cheaply to cover his costs.

His last method was using moulds but prior to that was just shaped blanks with CF skins. Secret was in laying the coats of epoxy to ‘just wet’ the balsa for blank making. Same with CF, and laying CF at correct angles to cover all bending directions. Then remove as much epoxy resin as possible and press together in plastic - foam - timber sandwich with lots of clamps. Leave for 24hours and then sand finish edges. Oh yeah, peel-ply can be used but having seen his fins was not needed.

Problem with his technique is you have to use 6 layers of CF. 3 per side all at directional angles. Lots of wastage and hence expense. But I could not bend one or twist one in any direction. I have much to learn. But since these are for myself I can afford to experiment. A decent fin costs between $100 and $200. I can waste alot of material while I learn at those prices. But once I know how the expense will be worth the new knowledge. Plus I make a new boat about every 2 months. So need a supply of fins I can afford. Obviously I sell my boats to pay for the next project.

Larry

I won’t completely hijack this thread, but if you decide you would rather buy a fin than make one, I have a CF Sailsetc fin for sale listed in the classifieds section. It’s completely plug& play.

-Eddie

Larry - If you decide to use the pre-curved skin method with a tin sheet don’t use packing tape over the metal surface, the whole idea is to have the outer surface of the skin smooth with little additional finishing. Use a release wax formulated for use with epoxy resins, I use TR brand, but there are quite a few others that are just as effective. You will want to use as many as six coats to start with. Each coat should be applied, given 10 or so minutes to harden and then hand buff. Then repeat. You can also try some of the spray releases that are specifically formulated for epoxy. I haven’t used spray releases that much. Which ever method of mold release you go with do a test lay up a couple of times and check for ease of release and surface quality before you commit to making a large skin.

Here in the US, I buy TR releases from the John Sweet Co., they are also a good source of carbon, aramid, and other composite products.

Fiberglast is another company that I’ve purchased from. They often have sales of overstock periodically which can provide one with some pretty neat stuff to experiment with at a discount.

Aerospace Composites, while expensive, is a good source for small amounts of exotic materials. Other suppliers may have minimum yardage requirements for cloth. Aerospace also sells braided tubing and other similar items that one would need to buy in bulk rolls (i.e., a lifetime supply if you are a hobbyist) from another source.

Niel - I might tend to disagree a little bit about the packaging tape. If tape is applied to tin mould, so it runs horizontal (across) the mould, the only finishing would be the very (very) small lines where the tape overlaps. Considering the thickness of the tape, I would seriously doubt there would be much if any detrimental effects of those very minute overlaps. My guess is a clear-coat finish would follow a very light (fine grade) sanding to restore gloss and unless there are gaps at the tape seams, the cloth WILL release. Miss a spot with release wax or PVA spray, and you would have similar relase issues wheter tape, spray or wax.

I use tape, a very thin wedge at the edge and a sligth bit of low pressure air and have not had any issues of glass sticking to plug or mould. And again, if clear finished or painted, those very tiny tape edges become invisible.

Guys, this is why I post here. RCGroups they all sail kit boats. Here I talk to builders with experience. I read Claudio’s thread with his foam build delta rig. Using tape over hull. I’ve used tape and plain plastic before with no wax for small parts. Miniscule lines disappear once I take off my reading glasses.

Niel, I am in Australia. Middle of summer here. Average temps between 25 and 30C indoors. Other day it was 43 - that’s 110 F in the shade. I was planning on using metal sheet curved and packing tape for easy release and insulation from temp. I use Axel Paste Wiz Mold Release. Smallest can sold is enough for do a 21’ yacht.

New question. The only carbon fibre I can buy is twill or woven cloth (FMS Fibreglass Materials). I guess woven cloth is better. It weighs 6 oz. (~ 200gsm) Is this OK? I can buy this in 1m x 1250mm lengths for $AU85 per metre. I was told for Uni-directional CF I would need to contact Japan or buy a full roll for $1000s. And with woven cloth I’d only need 2 layers? Second layer at 45 degrees to first. Is this the right path?

Thanx
Larry.

Larry - 6 oz./yd. plain weave is the weight most often used for carbon fins and I use it for some of my swing rig fittings. For boat hulls I’ve used 3 oz./yd plain weave, but this is extremely expensive cloth so I use it mostly for my own boats. You can’t use carbon in hulls in the IOM class anyway.

IOM keel fins aren’t that long. Using carbon cloth on the diagonal is for resisting torsional loads. Since IOMs have relatively heavy long bulbs this may be an important element to include in your fin lay-up. The skins should only be one layer of 6 oz. cloth so they stay flexible to form over your airfoil section. I would try to lay up uni-directional carbon on the diagonal rather than cloth since the torsional axis is more from the upper leading edge to the trailing edge near the bulb attachment. I think that you will have do some experimenting to find the best lay-up for your needs.

You can also try to put a few strips of uni-directional between the skins and the blank during lamination. I would wet them out prior to arranging them on the blank (just enough epoxy to wet all the strands but still seem “dry” so they hold together, not so that they “swim” when applied). Once on the blank the carbon strips should be spread out (uni-directional carbon tends to bunch up into rope-like bundles once it has been wet out). Be very careful when closing the skins, you don’t want the uni-directional carbon to squeeze out the forward edge.

I would look up custom racing motorcycle builders to see if they might be able to sell you small rolls (or ends of rolls) of uni-directional carbon fiber. They might also be able to show you some pointers on lay-up technique and carbon fiber reinforcing design to resist specific loads. I recommend motorcycle guys over big boat builders because they generally use lower tow carbon (fewer strands per strip) which is more appropriate for model boats.

Hi Larry
I don’t know how you feel about ordering from the U.S. but take a look at this link.
http://www.acp-composites.com/home.php?cat=251

I’m in Canada and I’ve delt with these guys once. Very friendly and easy to deal with.
Don

Hi Larry
for my RG65 I’ m preparing two fin of different lenght. The fins will be interchangebles.
http://www.rcsailing.net/forum1/showthread.php?5663-FUXIA-65-Polystirene-Story/page2
Cheers
Claudio

Don,
thanks for the link. How annoying! ACP Composites sell the carbon fibre I want for $US39/yd. Add shipping and the exchange rate works out at around $AU85… same as I buy it here in Sydney.
Right now I need 2 fins. Don, what do you make your molds from? I get shaping a plywood plug. But for the life of me can’t see how you make a mold only 3mm deep. And dead flat.
Niel,
I did say I cannot buy uni-directional in Australia. Told there is no market here. I’d have to contact makers in Japan. Hardly worth it for a yard of cloth.
Motor bike customizers? This is a small country… population 22 million.
Claudio,
Ciao – I await your next steps. And do you now of how to make a mold for a fin.

Seems like having a mold would be the easiest way as I have an immediate need for 2 fins. Then ongoing as I have order for 3 more new IOMs. So that makes 5. Below is a photo of someone elses fin mold and hull mold. I asked him his method but have received no reply. His user name is Lesnicolas posting rarely at RCGroups.

Hi Larry,
It is possible to prepare a mould for fin using plaster and others fillers, I need some time to prepare a sketch showing the principle.
See you tomorrow !
Ciao
Claudio

OK, I’ll try to explain but I’m not very good at it. Once you have your plug wax up one side. Get a piece of 1/8"(or thereabouts)plywood about 2" larger than the plug in every direction and cut a hole in it roughly 1/2" larger than the fin(on the flat). Put a strip of double sided (DS) tape on the unwaxed side of the plug and stick it to something flat, glass is good. Now put DS tape on the 1/8" ply and stick it down over the plug. You now have your plywood with the plug in the hole and a 1/2" gap all around. Gather up all you wife’s old candles and with a small torch melt them into the gap. Try to bring the wax level up to what would be the split between the left and right hand sides of the fin. When the wax has set carefully scrape the wax until you just have half of the plug exposed. Steel your wifes hair dryer to soften the wax a bit. The trailing edge is easy, the leading edge requires a little care but it’s not critical because you’re going to have to sand the leading edge no matter what. as long as it’s close to the center. OK, now wax the plywood and the plug some more and apply mold release. Now lay fiberglass over that. I use 4 or 5 lays of 1/2 oz matt with polyester resin(cheaper than epoxy. It should be about 1/4" thick. Put a piece of 3/4" plywood over that. fill around the edges with Bondo or such so there is no room for flex. let that set overnight. Now roll it over and pry off the 1/8" ply and what ever you used for a flat surface. Clean off the candle wax but do not disturb the fin if possible. Clean it up all nice and wax the hell out of it and apply mold release. Now repeat the resin, matt and 3/4" plywood on this side. When it has set drill a couple of pilot holes through the corners of the mold, not through the fin(don’t ask). Now pry it apart and carefully pry out the plug. You will have to grind a passage at the top and bottom of the mold to let the excess filler squeeze out when you clamp it. In answer to you earlier question you make the filler sort of thick, like mayo or peanut butter or Vegimite(I guess) The fin doesn’t have to be right full of filler as long as you have the edges full. You can mix graphite powder in with the filler to make it black. If you’re going to paint the fin you don’t need the graphite. Hope you can follow this, feel free to ask for clarification.
Good luck
Don

Check prices here, bottom of the page for uni CF:

http://fiberglasssupply.com/Product_Catalog/Reinforcements/Carbon_and_Kevlar/carbon_and_kevlar.html

I have also seen some good prices on Ebay, if you have that down under.

http://cgi.ebay.com/Carbon-Fiber-Cloth-Fabric-UNI-Directional-TAPE-1-5_W0QQitemZ110475500968QQcmdZViewItemQQptZLH_DefaultDomain_0?hash=item19b8da5da8

I use scraps of plexiglass to make parting boards for molds. Epoxy does not stick to it. Cut 2" strips and stagger them around your fin. I leave a thin, 1/16" gap and fill with modeling clay or silicone caulking.