Let me introduce myself first: I am from Holland, live in the eastern part of it, near the German border. I am married and have 2 boys (14 and 18 years of age).
I am not a newbie in RC modeling. I have built several e-motored boats in the past. I also have build a 1 to 100 scale model of the Marieje, a 1898 build Danish Galjas. (You can see the original here. The 1 to 100 model is described on the site as well: here it is!
At this moment I have a 1 to 20 scale sister on my workbench. (Although I have not worked on that model much recently.) This 1 to 20 model must be a really sailing version. In sailing however, I am a novice. So, I decided to build a Footy to get some experience in sailing.
I know the Footy concept for some time now and last month I have built my first Footy!
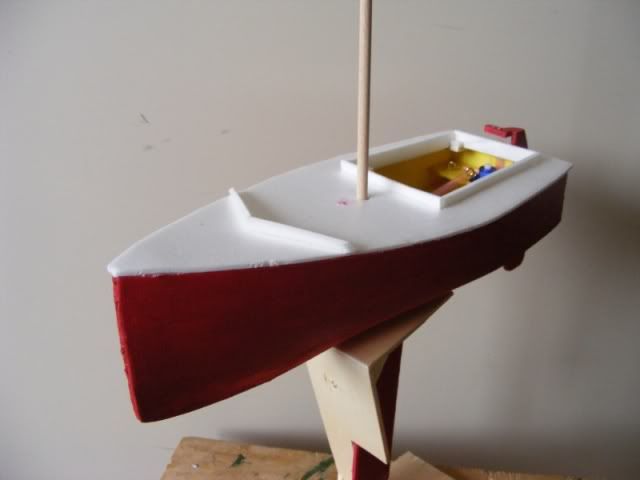
On the Footy site there are some nice drawings. Papaya III is a very complete drawing, good for a Footy novice like me. I found some foam sheets, left over from the flooring. I decided to use this as my building material. After some experimenting with different kinds of glue, I had a Papaya hull.
Sorry to say, but I didn’t like the hull that much. I had seen plans of the Flatfoot hull and tried that one for a hull. Yes! That’s the one for me.
So: I combined the Flatfoot hull with the Papaya rig, keel and rudder.
(I have posted my experience with this already on the Dutch Model builders forum: you can find it here and on the German Footy forum: click here.)
Now I want to share this with you as well!
Building photo’s:
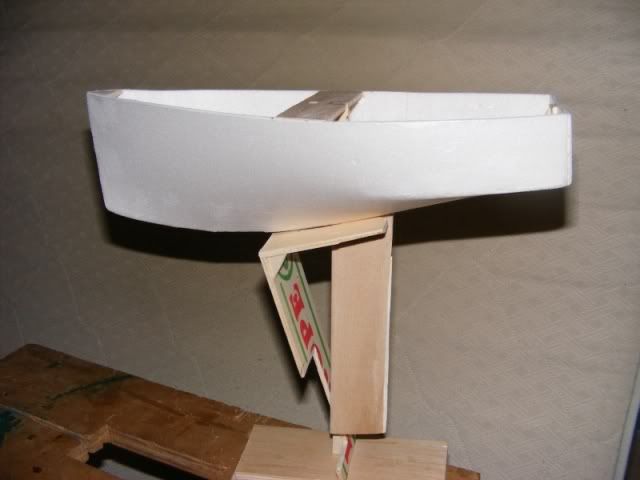
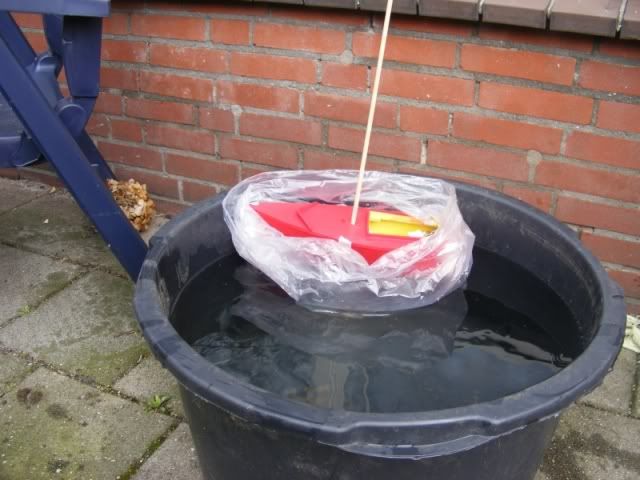
And then: The moment were she is afloat for the first time (in a plastic bag to protect it: it was not lacquered at that moment)
As this Footy should be looking like a Volvo Ocean Racer my son choose a sponsor:
Duff Beer!
Then: her maiden!
My son (the one who choose the sponsor) on the controls:
And me, changing the weight under the keel:
During the maiden, the wind was not very good. Apart from that, I saw that the sail which I made is far from perfect. So, I have build a McRigg look-alike. I got the information from the German Footy site.
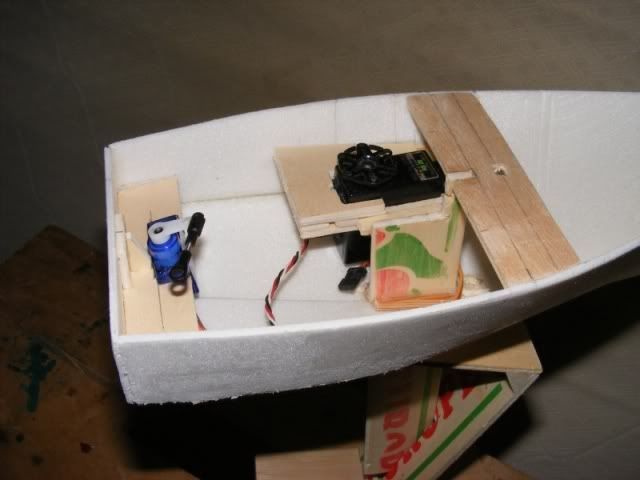
I used some materials which I had on stock: a glass fiber rod, a few pieces of welding rod and ribs from an umbrella. As a sail I had nothing on stock and we do not have a kite shop in the neighborhood, so I had to look for an alternative. I found a foil which is similar to the ones used for wrapping flowers. Unfortunately , this was not strong enough, so something else had to be found.
Now, I used a shower curtain. This is water resistant and wind proof.
I used double sided tape to make the seams. Unfortunately they didn’t hold, so I had to stitch the seams as well…
I wrote most of this before I could post on this forum.
Today I have tested the configuration of the Flatfoot hull, Papaya keel and rudder and some sort of McRigg (B-size)
I put the Duff in the water and all she did was going sideways! No, not forward, not backward, really sideways!
I had changed the position of the weight backwards, so I have undone that first. With this trial I noticed that the rigg didn’t rotate, not even with a loose line. I think the weight of the frame was too much concentrated in front of the pivoting point. The wind was not able to push hard enough. So, I moved the weight forward and I added some weight of the end of the boom.
Another trial. Still she didn’t go as I wanted. I decided to stop with this experiment. This combination is not proven.
I am now looking for a proven concept: a hull, keel, rudder and rigg which will work “out of the box”.
Maybe one of you has a suggestion? As I still want to build a working Footy!
To end this story: the last picture of the Duff with her McRigg ever. I have pulled out all the RC and now Duff has found her resting place in my sons bedroom.
After building a working Footy, I still want to build the Marieje in Footy size. I already have reduced the plans to fit in the box. When calculating the expected displacement I found a frightening 250 gram only! I think I have to redraw the plans to add some extra displacement.
The pivot point of your McRig looks to be too far aft on the sail. The center of area of the sail needs to be well aft of the pivot point in order to weather-cock with the wind. The pivot point (mast step) is probably also too far aft in the hull. In general, ypu want the pivot point a little forward of the leading edge of the keel, assuming the keel is vertical, and near the center of the hull. Then you will need to play with the exact location, to get it to balance, so the boat goes straight. Also, it pays to balance the weight of the rig, so it is balanced about the pivot point when you lay it on its side. You can also try blowing on the sail, to make sure that it pivots with the wind.
You should be able to get this hull to work very well with a little work on re-locating and balancing the rig.
Thanks for your reply.
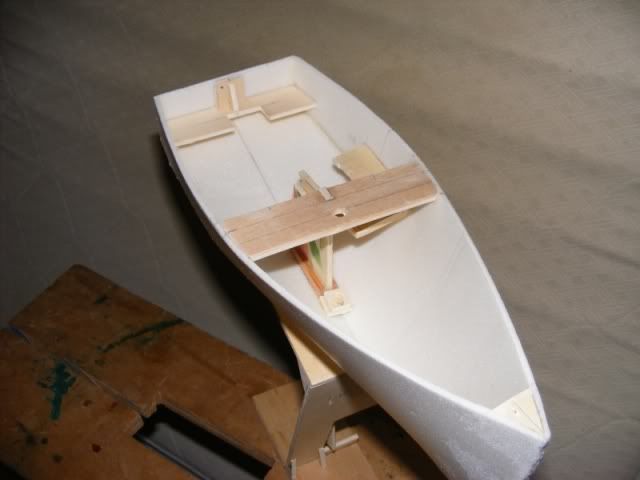
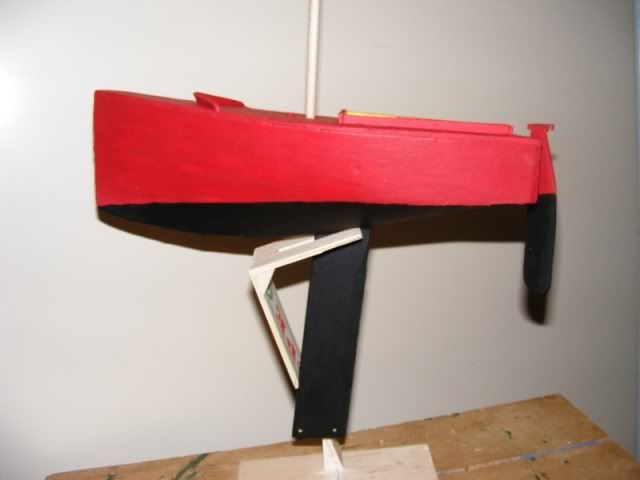
When looking at the side view of the boat you can see that the keel is not centred but to the aft.
As you noticed, the mast position has to be moved forward.
I am not able to reposition the mast and keel as the hull is made of foam. I reinforced the foam at the locations of the keel and mast foot.
When I now want to move them, I have to disassemble the boat and with that I will ruin it. I think my son will not appreciate that.
So, now I am looking for a complete design: hull, keel, rudder and rigg, which will work as it is.
I am not looking for a price winning boat, just a boat to learn how to sail and to learn what changes on the configuration will do with the performances.
All this to learn before I build my Marieje in Footy size.
Wimg - I think what Walt was trying to say was that your McRig itself needs to be remade. The location of the pivot on a McRig should only have at most 30% (25 to 27% is better) of the sail’s total area forward of the pivot. Also, the tip of the mast should be in line with with the pivot’s axis of rotation, in other words in line with a visual extension of the pivot on the rig. So, it takes some planning to layout and make a McRig.
Look for “the equilibrium rig down under” (and related threads) in this forum’s archives for all you need to know to design a proper McRig.
As to the location for the mast tubes, generally speaking, the first place to try locating the mast tubes is around 1.5 inches (381 mm?) forward of the floating balance point of the hull ready to sail, or as close to ready to sail as you can guesstimate. This is not a hard and fast number, the footies that are out there vary widely in hull shape and rig type, and these variables make a pinpoint location for the rig on any one hull impossible to predict unless you are working from extensively worked out plans.
Anyhow, you find this balance point by floating the boat on its waterline and then trying to lift it from the water with a finger of each hand evenly spaced from the bow on either side of the bottom of the boat. If one end goes down when lifted relocate your fingers a ways toward that end, until you find the place where it balances when lifted. I usually place the boat back in the water keeping one of my balance point fingers pinched at the balance point and use my other hand to mark the location on the inside of the gunwales, or, if the deck is in place I put the mark on a piece of tape on the deck. (Its a good idea to place a long piece of tape on the deck before you start the balance location operation.)
For a new design I use three tubes, one on either side of the one I place in the location I think is most likely to be the primary tube. Center spacing from tube to tube is 1/4" or 10/32" on my boats.
This should get you off to a good start on your next McRig. You need to be a bit more resourceful in locating sail material, that is what the internet is for. Also, try to research how other boats are rigged with special attention to fastening the sail to the mast, sail shape controls and sheeting systems. All this and you will build a great footy.
Certianly the rig looks in the wrong place. I have an Una rigged footy that works quite well (for a newbie to this design lark). I used the 507 footy rig thats on thie 507 yahoow group web site. This is how I did it.
Take one of the view of the papaya rig with the sails on. Cut out the sails (jib and main) so they are one piece. Put a pin in any coner of the outside and hang it up, draw a line vertical from the pin. Do it from another corner and another. Where they cross is the Centre of Effort (CE) of the rig. Can’t remember but I think it was about 20 to 30 mm aft of the mast. The footy 507 centre of effort is marked or you have to find it for the new rig. The new rig has to have the the CE in the same position as the original. In my case that ment a mast position towards the front of the fin. The CE of the 507 rig is much closer to the mast than for the Original rig so the mast has to move back as the CE must be in the same place. It seems to hold a reasonable course without too much rudder provided the wind does not make it heel too much.
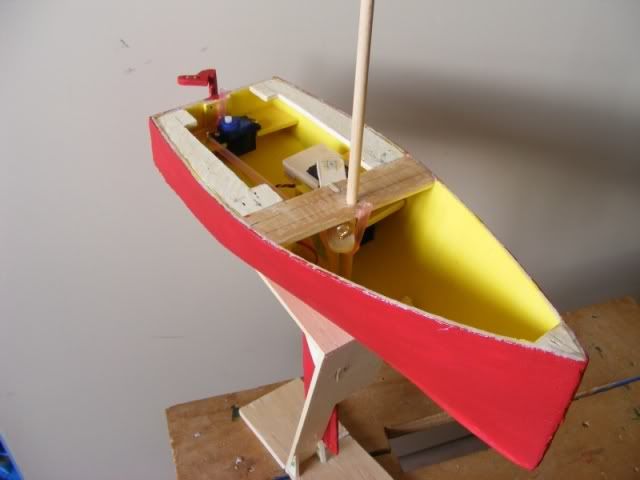
 my son choose a sponsor:


